Some things:

My photo
I paint small metal and plastic figures and rarely get to play with them. But that is fine with me.
Showing posts with label terrain. Show all posts

10 October 2023

You are Cleared for Landing (part 2 - Airfield Barracks, done)

 Found myself with a little time for hobby this past weekend so I constructed the final pair of Airfield Barracks buildings (See last post) in my collection and slapped some paint on the foursome. Simple paint jobs just so they are ready to be put down on the game table, but from 3 feet they look good enough to me.

Again, these are mdf kits produced by Father and Son Gaming out of Wisconsin, USA and I think they look very nice once done. Just like the initial two, construction was simple with decent instructions as reference from their website.

I find that I can only muster energy enough for "ample" painting effort for terrain pieces, though I may come back at a later date to add some weathering to these things as time allows.

The two newest prior to painting their greys and wooden areas.

All four for your perusal. They'll provide a nice bunch of blocking terrain on the tabletop.

Allied Bombadier's Eye-View prior to unleashing explosive hell.

A small post. Not sure when I'll be able to get more painting in, but I've also constructed the airtraffic control building as well as a small out building from the same Airfield terrain set so they'll get some paint after I get the aforementioned Guard Hut done (Crazy lines have begun to be penciled in.). I still have two radar dishes to put together for this terrain set as well as to fix a Freya radar that was very flimsy and difficult to construct without breaking pieces. 

Once all these efforts with terrain are over with, I'll be redirecting my hobby efforts back to miniature-painting. Which minis will be dependent on what details come out for a future WW2 Bolt Action event that is being organised in my area for the new year. 

Hope all are well out there!


- Dai

28 August 2023

You are Cleared for Landing (part 1 - Halt! - a Review)

 A quick last terrain post before the end of Dave Stone's Summer of Scenery challenge and a bit of a cheating affair as it's not strictly "Finished", but I'll throw it in there regardless as any hobby progress on my end is better than none at all.

I recently started work on yet another project that brewed up in my addled head all of a sudden and I went on a deep dive into the internets to get the pieces to make it happen. (One day I will finish a project... promise.) Currently, I only have one terrain setup for my 28mm WW2 games and as my regular reader will know, that's my Winter table. I now have (I think) enough terrain completed to set up a nice looking, modular and relatively full setup for my games of Bolt Action (and Chain of Command whenever Luke and I eventually try to learning that rules set). But that's it, just Winter theme and I really wanted another option to play on, something more suited to a Spring or Summer theme, but something you don't see too often - a German airfield!

Airfield Barracks. Nice little buildings and I have two more to construct along with an air-traffic control building, radar installations and another small building from their airfield set.

So enter Father and Son Gaming, an affordable MDF terrain store that is stateside (Wisconsin I think?), meaning postage rates aren't atrocious (Free S&H for orders over $75). I'd heard of these guys from the SNAFU Bolt Action Wargaming podcast and they seemed pleased with what they'd gotten so I took the plunge and ordered a number of kits. My order arrived swiftly considering Father and Son say they cut each order as they receive them, and in nicely shrink-wrapped parcels within the postage box. Communication from the vendor was great as well, with quick responses to my emailed queries.

In glorious black and white, a photo of a WW2 German sentry hut. Those stripes are actually red, black & white and applying that pattern to the side of my own sentry hut is going to be a right pig I bet.

So far I've put together four of their kits using white glue which has been just fine to stick them together. Their quality has been decent with sharp simple detailing and the finished models seem robust enough for regular gaming and also for transport to and from gaming venues. Instructions are provided through their website via links showing step-by-step construction processes for the more complex kits or short videos via their Youtube channel. Construction went smoothly for the most part on the kits I've put together so far with only a little trimming down to make pieces fit better here and there (As I've found with other mdf kit makers), but otherwise I found little trouble making these models which is great for this medium-skilled hobbyist.

This Crossing Barrier kit was simple to put together and came with three signs with "Stop" in German (As above), Russian or English - pretty cool. Here the barrier has it's base coat on and attending Sentry Hut in the rear, primed and ready for crazy zigzag pattern. The smoking German Guard fig is a kind donation from best gaming pal, Luke, who applied the basic colours of a Luftwaffe trooper for the project - I'll be basing and detailing him up a little more as time allows.
(Please ignore the intrusion of Ninja Turtles, Conan O'Brian and Charmander - there's definitely too much crap on my hobby workspace.)

I have always liked mdf terrain models, having constructed multiple from different manufacturers during my years as a gamer (4Ground, Sarissa Precision, etc). Father and Son Gaming kits so far seem more hardy than others that I've encountered, but more simple in design and lacking in detail of pricier alternatives. This is fine by me as these kits look good regardless of their lack of complexity and will be fine for tabletop wargaming whilst still looking great on the table. I still have to apply paint to the ones I've put together and will post pics once done. 

Hope all enjoyed this little review/preview post of my new terrain project for my games. I also have more of their range to construct and I'll post my experiences with those kits here at a later date along with my other planned terrain features for my Airfield project.


- Dai


17 August 2023

選択してください

( For those not versed in reading Japanese Kanji, like me, the title translates as "Please make your selection" - thank you Google Translate.)

These are another entry for Dave Stone's Summer of Scenery Challenge. Four scifi/near future vending machines from the now discontinued Antenocitis Workshop cyberpunk-esque range. Simple resin sculpts, they depict snack and soda vending machines of a style commonly found in Japan. 

Comrade Yeltsin and a creepy.... "thing" for scale. Looks like these sculpts are more in line with 32mm or 1/48 sized figs than 28mm?

Online searches for examples of vending machines like these in existence on the streets of Tokyo and other large Japanese cities show that they typically are white in colour so I went with the clinical look from real life rather than branch out and get all silly and neon about it. 

So many choices!

Old lady about to break her diet

The printed details are just cut from thin card sheets provided with the set. They were a pain to cut to size properly, but I'm glad I put in the effort as they look great glued on. 

Sodas and snacks and I think even a row of cigarettes?

Side adds are repeated on the other side. Fun anime-esque stuff.

The rear sides also have adds - futuristic cars, fights and cyber arms. 

Whilst I haven't played any scifi games in a long while, these will find use eventually (Maybe once the weather returns back to "Not Depths-of-Hell-like"?) in a planned solo scifi scrap I have brewing in my head.

This creature must choose wisely, tho I wonder how it'll open a can or bottle of soda with that point spike hand?

Still more on the hobby desk to add to my tally for this Summer of Scenery, so hopefully I'll have at least another two posts to put up before the end of the month. 

Thanks for stopping by and for commenting, if indeed you do!

- Dai

08 May 2023

Mr Ed’s dead

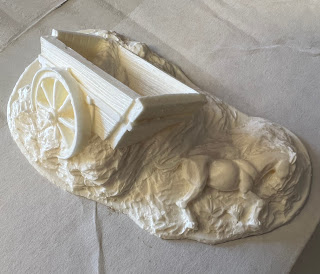
 Another quick terrain post, this time a resin scatter piece I found on Amazon last year to add a little interest on my Winter set up.

Looks like a white chocolate treat. (I promise I didn’t try a taste…)

As you can see it’s a dead horse and upturned cart. I feel the cart is a little large compared to the horse but otherwise it’s a decent sculpt overall. 

Primed dark brown, then base colours and simple washes. I chose black for the horse so it would stand out more 

Snow effects didn’t work exactly to plan - after a spray with my usual dulcoat varnish it turned the snow piles into ice or frost, but that can work on a Winter table I guess, or maybe I’ll go back to it at a later date and add some more snow. (I’ll think on it)

Done, or is it? Maybe I’ll go back to it at a later date…

Showing cart’s contents - more dirt apparently

Next up - hopefully those new fences seeing as I’m on a small “terrain roll” of late.

Hope all are well out there,

 - Dai

28 April 2023

Can't See the Woods (Part One)

 No really, these are tree bases, but there are no trees. War is  hell for the arboreal world as well apparently.

In my last post I mentioned I would be working on these mdf bases I picked up on Etsy, and "Winterising" them so they'll match my Winter gaming set-up.

Assembly was very simple - they came in two main pieces that were very simple to match up and wood glue together. The hole cut-outs had the round wooden discs included so I stuck them aside in my hobby drawer as one never knows when one might need something like that.

White glue was applied liberally  all over then sand from a local beach to give a nice texture. Sprayed brown once dry, dry brushed with a couple successfully lighter brown highlights and then I sat and pondered if I should add a bit of grass here and there. I decided "no", the trees in such a cold area sucked up any food that weeds or grass might have required so nothing else is able to grow on these things!

Snow about the edges is a mix of white glue and Woodland Scenics Snow Flock applied in two layers to give more depth and now they are sat ready for a quick spray of matt varnish to set everything. 

Pikachu presides over this parade of bases. I'll be  kicking the little yellow rat back into his Pokeball in good time, he eats all my cheese.

Now tell me this wasn't an exciting post!? 

I get it, "more minis, less.... non-minis Dai - yawn". 

Can't promise my next post will show off any painted miniatures as I have lots more terrain stuff to get on with. But I'll try. 

Stay safe out there - Dai


17 February 2022

Some Citadel Classics and Other Bits


Until this week my hobby had been left idle. No painting, no construction, nothing. But the mojo strikes when it wants and I guess we are all slaves to that in one form or another.

There was no inspiration or direction for what was finished up for this post, just grabbing random stuff and basically being happy to get them off the unpainted mountain. We start off with these three fellows, a trio of old 80’s Citadel Miniatures. Lovely sculpts and all fun to paint. 

Up first is this Sea Elf. Originally he was the officer of an elven bolt thrower kit. Don’t ask me where the other crew member is or even the bolt thrower itself! Lost to the sands of time… I really like this simple sculpt and it’s decidedly leader-like pointy pose. I decided to make him look less “human” (His ears being covered up by his tall hat and all.) by giving him this decidedly cool grey-tones skin colour. 
 
“Sea Green” elfish dress thing was appropriate I think and the white armour parts like she’ll? No, eh, it’ll do.

Grey skin? That means black hair. Obvious, no?

This next chap is from the old Norse line of figures. Foundry picked these up and still produce most of them to this very day I believe. I think he’s supposed to be some sort of noble and looks the part with his fancy horse hair helmet plume, gold necklace and fur lined jacket.
I like this bloke, his face is all stoic and heroic. Painting his  eyes was a bugger tho as they are so flippin tiny!


This shield design was an off the cuff  effort, think it works out. 

The last of these figs is another from the Norse range who was also sold as a Barbarian too later on. I deliberately kept this paint job clean and simple after originally planning out some tattoos for all that skin. But no, laziness took over and he can stay pale and weird mullet-y. 
For such a naked (with He-Man underpants), he strangely had no nipples sculpted on. So I painted them on instead. I think this was a good choice. 


This terrain piece has been sat unpainted for years so I slapped on some base coats, wash and a simple highlight. Yet to get a coat of varnish, I think it’ll look great on the table. It’s a part of a Reaper Bones set that has a dragon and heroes fighting it and there was other parts to it but… no idea where those got to. 

Semi-naked berserker posing for scale


This second terrain piece is for some natural rough/ hard terrain and is Pretty much what it looks like - rocks and clump foliage glued to an old cd. But it’ll work for games and as these two warrior-models show, sometimes cheap homemade crap can work to.

Varnish coating also needs to be done on this.

Was thinking about adding some flock but I think it would make placing minis atop troublesome so stuck with dirt. 

Last for this post is a simple build pic. Luck was with me before Xmas as my wife’s friend ordered a mini for her husband but for some reason sent it to us instead. She said keep it and so I ended up with this nifty GW Lord of the Rings Eomer set. Put him together just last night and he really does look like Karl Urban’s effort from the films. No idea when I’ll get around to painting him and I’m definitely NOT starting a new army! (He’ll find use in my dnd games eventually)

Really liking the mounted and not versions. He also had helmet and spear options to build him with but my wife liked the helm less and sword versions better so I went with that.

01 November 2021

Warhammer Chapel

 Being off work for these past weeks has finally allowed me to set up the temporary hobby station and get some painting going.

With my wish to try to get a solo game of Burrows and Badgers played sometime soon, I knew my fantasy terrain needed a few additions to help have some choices for different scenarios. (And also for other rules sets games in the future.)

That meant that this little building moved to the front of the queue. It’s a now out of print Games Workshop fantasy Chapel that I’ve had sat primed since I first received it maybe 8 or so years ago. About time it got some colour really!

Decided turquoise tiles and off-white walls were my primary scheme. The wife suggested darker masonry to complete the scheme and I feel she was right!

The kit had so many typical GW overthetop skulls EVERYWHERE! So I remember pulling out the green stuff to fill in all sorts of alcoves, etc to tone that silliness down.

Here’s cleric Horace pointing out that this chapel is heresy as it’s dedicated to the wrong god, which of course is not his god. 

Dunno where the leafy vine came from but it makes for a nice spot colour.

Still a few skulls about the building including the one on the door painted red, but a few are acceptable.  

Currently working on a Burrows and Badgers mini to add to my Rogues team and then on to something else, maybe even more Burrows and Badgers? 


09 August 2021

Green Meanie

Sunday saw the end of my 7-day break from work. Most of that time was taken up dog sitting for 5 raucous and annoying dogs, so not at all restful. But! As my previous 3 or so posts have shown, I've had a bit of time to work on my unpainted mountain, so not all bad, eh?

So to the subject of this post's title, after seeing Dave's own painted Space Ork on his Blog, I was suddenly inspired to (finally, I've only had this mini for almost 20 years or something) get this big bugger off my unpainted mountain as a palette cleanser type effort. He's an older metal Games Workshop Space Ork Nob (A larger, leader variant of the violent alien species). I'd originally picked him up to join as a mercenary-type character for one of my Rogue Trader teams for an old INQ28 project. Now, strictly speaking, the typical merc within the Ork faction are of the honourless Blood Axes Clan, but this fellow didn't fit the "Blood Axes" aesthetic, nor (My personal favs) from the Evil Sunz, so I painted him up to be from the Goff Clan. So black with black and white chequers. He had a lot of detail, so it took a LONG time to get him done, but looking at the finished result, I'm pretty happy how he turned out. No idea when or if he'll ever see time on the game table, but I'm glad he's finished.


Ridiculously huge weapons make for a comical figure. I decided that the little pet (A Squigg) on his banner pole should be a garish colour to contrast well with the otherwise dull rusty metals and dark skin and black clothing. The sculpt does have eyes under that helmet, but they were so damned small I felt that if you were peering that close to look at them then you can paint the flippin things in.


Curious place for piercings.

Not the back banner he was supplied with (No idea where that went.), luckily had a selection of plastic options as a replacement and this one was the most fun I think.


I cheated a bit with the chequers, using a very fine Micron pen to draw the lines, then filled with paint. End result after a quick gunmetal sponge are some "good enough" pauldrons!


Those big arms should have been pinned, but I had to paint him in pieces, so I hope the Gorilla Glue holds!

Lastly, I also got this simple resin effort off the table - named a "Water Container" and from the now OOP Warlord Games "Project Z" range. I've seen these things in real life on the farms where my in laws live, but they are used for chemicals and not water, but whatever. I based it's colour scheme off one of those though, with a little murky looking wash in the recesses as though it's been left out and alone for a while. It'll feature as a small scatter terrain piece for my Zombie Outbreak project game.


Not sure what'll be next as I feel a small break from the paint desk is required. (My back says "THANK YOU!".)

Hope all are continuing to stay safe out there,

- Dai

04 August 2021

More scenic pieces


 Finding a little more time to myself in the last few evenings has allowed me to work on some more terrain pieces in my unpainted mountain for the Season of Scenery challenge.

The first of these are a pair of wrecked vehicles from the Waling Dead minis game. The car kinda looks like a Mercedes and the truck a Chevy in my mind. 

Painting was simple base/drybrush/multiple-washes. Tried to make them look like they’d been left out for a bit too. The sculpts are good enough for gaming and their price point and the box comes with duplicates too which is nice. 

These will find use in my (ever so slow cooking) zombie survival game project.


Joe’s Tows. No tow hook tho. Joe isn’t that smart. Neither is my freehand lol

Third piece to show is a statue I put together. 40mm base with a Gatorade bottle lid and an old metal Reaper miniatures kneeling Paladin on a curved lipped 25mm base. With a little dry brushing some washes and some basing elements to age it I think it came out looking better than where it started, which honestly wasn’t very encouraging! Lol

I think it’ll be usable for both fantasy games but also historical at a push? We’ll see. 


This post was put together exclusively on my iPhone so I hope it and the pics comes out okay, feel free to let me know.

Have moved onto something very different now these are drying after being varnished. Hope to have pics posted up soon.

As always, stay safe out there.

- Dai


02 August 2021

All Praise the Three-Armed Goddess!!!

 Today is my second entry for a fun little challenge that Dave over at Wargamesculptors Blog has run during Summers called "Season of Scenery" - an effort to help motivate hobby bloggers to get some of their backlog of terrain pieces done during these hot and sweaty (At least it's hot and nasty where I live in the world) Summer months. 

My last post featured my first entry as vehicles are allowed and this one will be completely different from that!

Nice Statue of Saint Celestine, patron saint of white chocolate and skulls.

Earlier this year, Games Workshop released a new range of plastic miniatures for their Adeptus Sororitas range (Battle Sisters/Nuns to the older Warhammer 40K gamers reading this). Lovely sculpts that like much of what they design these days command a high msrp. A terrain model was part of the release which included this statue as part of their "Battle Sanctum" kit. I didn't want to shell out for the whole model as I have plenty of 40K buildings in my unpainted mountain waiting to be assembled and painted, but I saw that statue and thought.... "That would make for a cool terrain centerpiece for my Genestealer Cult project (That has sat long neglected *cough cough*)...." So I hopped on Ebay and found a seller selling just that part of the kit and for an affordable price. 

Now, although the stock sculpt is a very nicely designed piece, my image in my mouldy ol' head of the statue for my army was a different image. So once the kit arrived, I pulled out my Greenstuff and got to sculpting!

And.... enough waffling on! Here's the pics:

Pre-primer. I wanted her to pretty much look as if the Cult members took a treasured statue
 of the Imperium and corrupted and changed it to represent their own hero/idol. I changed the sword with some spare Genestealer claws instead of the standard winged crossguard, snipped off and replaced the Sisters of Battle Fleurs de Lis here and there with little skulls and added a spare Genestealer skull on the base of the statue where you're supposed to glue the little candles. I thought it would make for a nice little altar to a fallen family member.
The head and arm were sculpted from scratch. Now, I'm not going to say I'm ever going to be producing miniatures professionally as from this pic is all looks like turd. But I wanted them both to be a bit rough looking, rough hewn sculpting- my Cult are not known for their artistic talent! 

For the scheme I went with something similar to the Studio scheme, but wanted the "added" parts to look as though they DEFINITELY do not look like they belong there.  

This is a rather large model and I am sure I could've painted it to a higher standard, but oof.... that's a lot of alabaster/bone and I got bored quick! So tabletop standard is good enough for me.

Have to say, those wings are lovely.

Her 3rd arm was based off of a Genestealer fan art I found online. Didn't want it to be all splayed out to show the claws as I didn't feel that it looked natural. Gave me a small task to try to make a 3-finger-fist which I think I did well enough.

Close up of the face all painted and pretty.

The sword is the standard sculpt with a couple changes. I like it. 

Close up of the base. Red candles for some spot colour and the nice white skull of ol' Aunty Bess the 1st 'Stealer to land on the planet and start the Cult "all those years ago"...

I have another piece to post up on probably later this week and maybe some more. Has been a nice excuse to get some long unloved terrain off the unpainted pile.

Forgive also if I haven't commented on your blogs of late. For some reason my Reading List isn't populating with ANYTHING and I don't know why. Waiting to see if it fixes itself, but if not in the next few days, then I'll reach out to Blogger to see what can be done.

Stay safe out there through Covid Delta folks!

- Dai